By Ron Hood 2000
(First published in Self-Reliance Journal)
I never thought that knife making could be so trashy.
Recently my personal need for steel took another leap, oddly this time it was into the junk heap! It happened while we were filming a video about primitive knife making with two of the leaders of the Neo-Tribal Metalsmiths, Tai Goo and Tim Lively. What I learned from them about the process of converting junk into not only serviceable but beautiful, durable and functional blades, made me rethink a lot of what I have held as gospel for years. I also yearned to try to use their primitive metalsmithing techniques under wilderness survival conditions.
I should say that I think most knife collectors have seen or used blades made by “Uncle Jasper” who created knives from old files or busted saws. Some of us even own a few of these ancestral blades. Most of these old blades were created by “stock removal” methods, grinding away anything that doesn’t look like a knife. The Neo-Tribal folk on the other hand rely primarily on forging techniques…heating and then hammering the old steel into shape. They then harden and temper the resulting blade using a variety of methodologies. What I learned from the Neo-tribal masters seemed like something that could be accomplished under field conditions.
Mid June Y2K my wife Karen, Rob Simonich and myself led a gang of 12 wilderness folks into the “River of No Return Wilderness” of central Idaho. The participants carried every conceivable make and model of modern blade but for the first time I left behind all of my modern cutlery and carried only my primitive hand forged Lively and Tai Goo blades. Made of truck springs, the hardening and tempering on these blades had been performed with transmission oil, vegetable oil, barbecues and red-hot tongs. (Their construction can be seen in our primitive knifemaking video.) The blades look primitive by modern standards but then they should, after all, they were hammered into shape in a few hours with less than 3% stock removal!
One of the objectives of the trip was to see if we could apply the techniques of the Neo-Tribal metalsmiths as shown in the video, to the field, using only natural and manmade materials we found in our travels and the materials we carried in our survival kits. I made one concession to the process… We brought along a fencing tool.
What’s a “fencing tool”? It goes by a variety of names but out here it is a multipurpose tool incorporating a hammer, pliers, nail lifter, wire cutter and if used correctly, a can opener. It is probably the ancestor of all multipurpose tools as variations of this tool have been around since before the prairies were fenced.
I was confident that we would be able to locate plenty of material for use in a camp built forge. I’ve learned over many years of wilderness teaching and trekking that some people act like pigs when they head for the woods. When they are finished with something these two-legged trash trucks would rather toss it aside than carry it back out. Our plan depended on locating old hunting camps and the junk left behind by the human dump trucks. Find them we did.
We identified four steps in the wilderness metalsmithing process;
- Locate and transport materials to the worksite
- Construct a charcoal kiln.
- Construct a bellows and forge.
- Test the forge and make something
Step one: Locate and transport materials to the worksite.
Three days into the trip I sent the Tractors (Our motto for the group… “We eat more dirt than a tractor”) off on a daylong gathering expedition. Within 6 hours we had collected the bottom third of a 30 gallon drum, two 1 Gallon Coleman fuel cans, one empty propane cylinder, two fiberglass “ribs”, a pair of rotted fatigues, two elk leg bones, some cans, four large steel spikes, a handful of smaller ten penny nails, a steel rod, a horseshoe, some wire and some other bits and pieces. We had a veritable treasure trove of materials to work with…
Step two: Construct a charcoal kiln.
Charcoal is virtually essential to a wood-fired primitive forge. While forging temperatures can be reached with hard wood fires and a good bellows, we had only Ponderosa and Lodgepole pine, woods that are too soft to get the really hot fire we needed. Our first objective was to create a charcoal kiln with the 30-gallon drum. To do this, our initial step required a trench over which we would set the drum. We used our .45 ACP drills to ventilate the bottom of the drum. With the drum thusly ventilated and placed over the trench we should be able to get a good air draw into the drum from the bottom and the wood should char quickly. Ideally, after the wood was reduced to red-hot embers we would close off air to the bottom of the drum, cover the embers with dirt and douse the fire with water. In the morning we would have our charcoal.
As the kiln fire burned and the hair on my legs started to char I realized how hot the coals were getting so, in the interests of science, we tossed in the rusty horseshoe. In a short while it was red-hot but not the cherry, non-magnetic, hot we needed for forging. Still, by using a stout piece of Lodgepole pine as a cudgel it was hot enough for us to beat the steel into a straight piece of metal suitable for use as a spear tip. Just for the heck of it Rob Simonich battered one of his Nordooh blades through the red-hot steel with the heavy wooden club. I should add that by doing so he violated the warranty in his own blade. The blade survived as a mildly serrated Nordooh. No one else was willing to offer a blade to the gods of fire and steel.
Step three: Construct a bellows and Forge.
Airflow is crucial to a forge. Air, fuel and fire create heat and we needed lots of air to make our camp-made charcoal into a viable heat generator. The closer we got to fission the happier we would be. One of our members, Ray, came up with the ideal solution. Using a heavy-duty trash bag and a flexible fiberglass rib found at a hunter’s camp, he made a huge bellows. Attached to the bottom of the bag and held in place with junk wire was a hollow Elk leg bone. That bone was connected in turn to a piece of the fatigue pants leg and then to another piece of bone. The pants leg gave us a flexible connection between the two pieces of bone pipe and acted incidentally as a valve to restrict airflow from the fire back into the bellows. The resulting bellows blew so hard it put a smile on everyone’s face. Our initial use for the bellows involved the charcoal kiln where the additional air helped to speed the charring process.

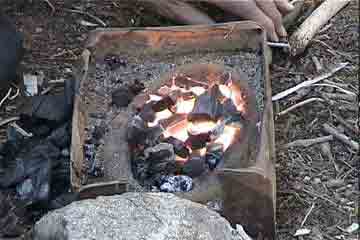
The forge didn’t need to be large for our purposes. We were planning to test the theory and application of a technique seen in our video but this time in a wilderness setting. Our forge was made of one of the old Coleman cans with one side removed. The pour spout became the air inlet and the interior was lined with mud taken from a nearby stream. To make our “fire mud” Eric, our forge meister, collected mud, mixed it with wood ashes from our fire and added dried sedge grass to give it strength. After forming, the resulting forge box was dried in the sun.
One of the old beer cans was sliced open and rolled into a tube to function as a Tuyere (Pronounced TWEER… an air inlet for a forge or blast furnace) and inserted through the fuel can pour spout. Ray connected the bone bellows outlet pipe to the Tuyere tube and we had our forge.
Step Four: Test the forge and make something.
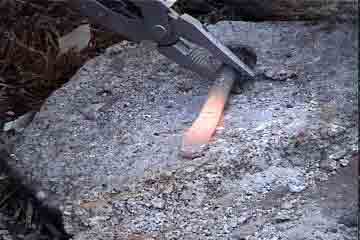
The group accomplished all of the steps above in a single day. The following day we would test the assembly and the overnight rest would give the mud some time to cure. We started a fire in the little forge the next morning and there was a short cheer when the first rush of air came blasting into the forge chamber. The bellows worked like a charm and the homemade charcoal glowed a ferocious white/red when the air growled into the hot coals. First into the fire was one of the 10 penny nails. Five minutes after hitting the heat and with a piece of granite as an anvil I had finished shaping and hardening a primitive paddle drill. Nothing sophisticated here. I heated the nail till it was cherry red then smashed the tip flat with the hammer on the fencing tool. I sharpened the edges with a smooth stone then reheated the nail and plunged it into cold water to harden (quench) the steel. The drill made clean little holes easily. The first tool was finished. Later this nail drill was used to make holes in bone buttons, lanyard holes in wooden spoons and for many other tasks.
Next we heated one of the large steel spikes. With roughly a ½ inch diameter we figured it would make a fine chisel. It was a bit too long so we heated it till it was soft, whacked a couple of dents in it then broke it in half. Several more heats and we had our hammer forged chisel. We stone ground it to shape and then water hardened it. We had made a steel-working tool. Now we could cut other hot steel.
We could have continued the forging process and made knives, tongs or other tools but my point was made. A primitive forge is a do-able project…. Primitive steel knives, tools and weapons can be made in a wilderness setting. Next time I’m going to turn the remainder of that steel spike into a spearhead, the heavy bolt will become a knife and the wilderness will hear the dull think of my hammer as it turns trash into goods.
Oh! And the Lively and Tai Goo blades… How’d they stack up? I wouldn’t hesitate a moment to recommend them to anyone. They may look primitive but their performance, balance and feel is very modern. The primitive appearance is beguiling and grows on you as you understand and appreciate the expert skill of the metalsmiths who made the blades. Now I’m gonna go search for grandpa’s old hammer forged knife… the one he made from a file, I heard tell he never had to sharpen it and it was so sharp he cut all the way back to the 4th century…
OH! and by the way, you can see the entire process in our Survival Camping video…
Hoods Woods Wilderness Video Productions
www.survival.com
(208) 651-6309
Neo Tribal Metalsmiths
Tim & Marian Lively
PO Box 8784
Catalina, AZ 85738
www.livelyknives.com
Tai Goo
www.neotribalmetalsmiths.com
Simonich knives
(406) 933-9151
Rob Simonich
Box 278,
Clancy MT 59634
www.simonichknives.com
Ed Note;
Ron and Karen Hood own Hoods Woods Wilderness Video Productions in Coeur D’ Alene, Idaho. The Hoods just completed a 1 hour 45 minute video titled “Primitive Knifemaking” in which primitive knifemaking and forging is examined in detail. This video is the 13th survival skill video the Hoods have produced. You can learn more about them and the videos at www.survival.com or you can call them directly at (888) 257-BUGS